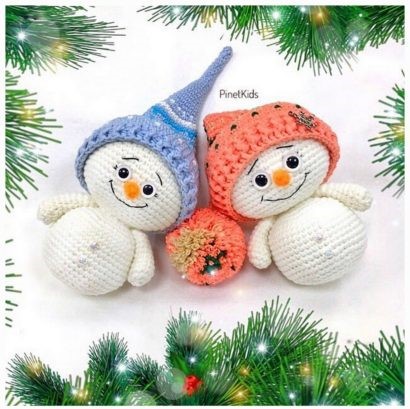
Cute Penguin Amigurumi Free Crochet Pattern
Pinterest Offical Page : Amigurumfree.msa.plus
Facebook Group: Amigurumi Free Patterns
Facebook Offical Page: Amigurumfree.msa.plus
Materials
Plush yarn of white color and the color of “Cloak”
about 0.5 skeins
Orange yarn for beak and paws
Eyes on a secure mount 18-20mm if will knit with ready-made eyes
Yarn blue and black, if eyes will knit
Yarn for a hat and a scarf (I tried to knit from YarnArt Jeans and from yarn with wool in the composition – the second option is softer and cozy)
Hook for plush yarn (I crochet3,5), a hook for semi-cotton yarn (I knit crochet 2), a hook under the yarn for the eyes (I used 1.25)
Filler for toys
Stitching needle, scissors

Abbreviations:
sc – single crochet
inc – increase
dec – decrease
ch – chain
sl st – slip stitch
dc – double crochet
PATTERN


Body head
We start with the legs 2det:
1: 6sc into magic ring
2: 6inc (12)
3: (1sc, inc) x6 (18)
Connect the details:
4: 18sc for the first part, 18sc for the second part (36)
5: (5sc, inc) x6 (42)
6: (6sc, inc) x6 (48)
7-13: 48sc
14: 12sc, (1sc, dec) x8, 12sc (40)
15: 40sc
16: 10sc, (3sc, dec) x4, 10sc (36)
17: 36sc
18: (4sc, dec) x6 (30)
19:30 sc
20: (3sc, dec) x6 (24)
21: 24sc
22: (2sc, dec) x6 (18)
23: (1sc, dec) x6 (12)
24: 12inc behind the front wall (24)
25: (1sc, inc) x12 (36)
26: (5sc, inc) x6 (42)
27-32: 42sc
33: 9sc, 6dec, 8sc, 6dec, 1sc (30)
34: 9sc, 6sc per rear, 9sc, 6sc per
back wall (30)
35:30 sc
36: (3sc, dec) x6 (24). If you use eyes
plastic – insert them between 31 and 32 rows
37: (2sc, dec) x6 (18)
38: (1sc, dec) x6 (12)
39: 6dec. Fasten the thread, tighten the hole, thread
hide.
Beak
1: 3sc into magic ring
2: 3inc (6)
3: (1sc, inc) x3 (9)
4: (2sc, inc) x3 (12)
5: (3sc, inc) x3 (15)
6: (4sc, inc) x3 (18). A thread
trim leaving an end for
sewing on. Try on and
sew a beak between 5 and 9
near the head.
Paws
1: 10sc, with the second from the hook loop 8sc, 3sc in
last loop, 7sc, inc (20)
2: inc, 7sc, 3inc, 7sc, 2inc (26)
3-6: 26sc
4: dec, 9sc, 2dec, 9sc, dec (22)
5: 22sc
6: dec, 7sc, 2dec, 7sc, dec (18)
7-9: 18sc
10: dec, 5sc, 2dec, 5sc, dec (14)
front end.
11: dec, 3sc, 2dec, 3sc, dec (12)
12: dec, 1sc, 2dec, 1sc, dec (8)
Remove the hole. Fasten the thread, hide it.
Try on and sew on the paws.
Eyes black and blue yarn
Black yarn
1: 3ch, with the second from the hook loop 1sc, 3sc in
last loop, inc, ch lift (6)
2: 6inc, ch lift (12) change the thread to blue
3: (1sc, inc) x6, ch lift (18)
4: 2sl-st, 1sc, inc, (2sc, inc) x2, 2sc, 2sl-st
4: 2sl-st, 2sc, (2sc, inc) x2, 1sc, inc, 2sl-st.
Try on and sew eyes
Cloak (in rotary rows)
1: 2ch, from the second loop 2sc
2: 2inc (4)
3: 4sc
4: 4sc
5: 4inc (8)
6: inc, 6sc, inc (10)
7: inc, 8sc, inc (12)
8: (1sc, inc) x6 (18)
9-10: 18sc
11: 2inc, 14sc, 2inc (22)
12: 2inc, 18sc, 2inc (26)
13: 2inc, 22sc, 2inc (30)
14-15: 30sc
16: 13sc, 4HDC, 13sc (30)
17-18: 30sc
19: 15dec (15)
20: 3dec, 3sc, 3dec (9)
21: 9sc
22: 9sc behind the front wall
23: inc, 3sc, inc, 3sc, inc (12)
24: (1sc, inc) x6 (18)
25: inc, 16sc, inc (20)
26: inc, 18sc, inc (22)
27: inc, 20sc, inc (24)
28: inc, 22sc, inc (26)
29-32: 26sc
33: dec, 22sc, dec (24)
32: dec, 20sc, dec (22)
33: dec, 18sc, dec (20)
34: dec, 16sc, dec (18)
35: (dec, 1sc) x3, (1sc, dec) x3 (12)
36: 6dec (6)
37: 6sc behind the back wall
38: 6sc
39: dec, 2sc, dec (4)
40: 2dec (2)
41: dec
Cut the thread, hide it. Try on and sew
raincoat to the body of a penguin.
Wings
First we knit 2 white pieces, then we knit black,
we attach the white part. Again the black part and
tie white.
1: 2ch, with the second from the hook of the 2sc loop
2: 2sc
3: 2inc (4)
4: 4sc
5: inc, 2sc, inc (6)
6-9: 6sc
10: dec, 2sc, dec
11: 4sc
12: 2dec
Sew wings to the body where you finish 2
decrease.
Beanie
The number of loops depends on the yarn you choose
and a girth of the head of the resulting penguin.
1: dial a chain of stitches equal to
penguin head circumference and close in a circle
2: 2ch lift, then DC to the end of the row, sl-st
3-5: 2ch lift, embossed posts to the end of the row,
SL-ST
How to knit embossed columns see here (video
on relief columns)
6-10: 2ch lift, DC to end of row, SL-ST
11: 2ch lift, (1DC, dec) to the end of the row, SL-ST
12: 2ch lift, (1DC, dec) to the end of the row, sl-st
Pull off the hole. Make a bubo and sew on.
Scarf
Dial a chain of air loops of the desired
are long. Do a 2ch lift and knit the first row
DC Rotate knitting, 2ch lifting, embossed
columns to the end of the row. So knit
required number of rows. Our scarf is ready.