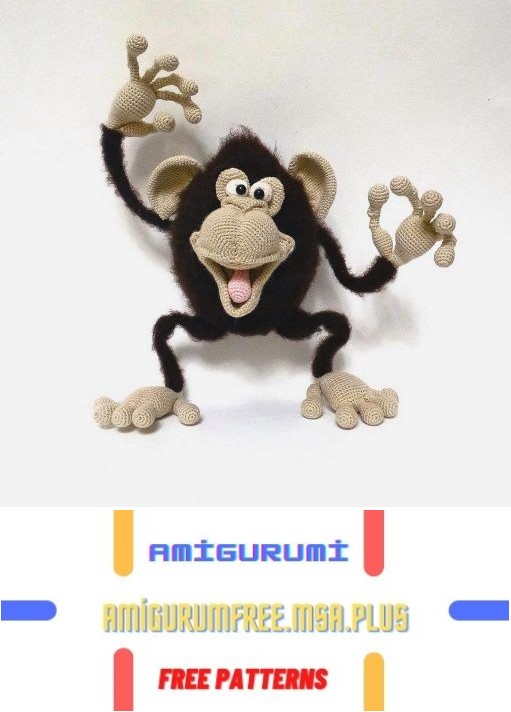
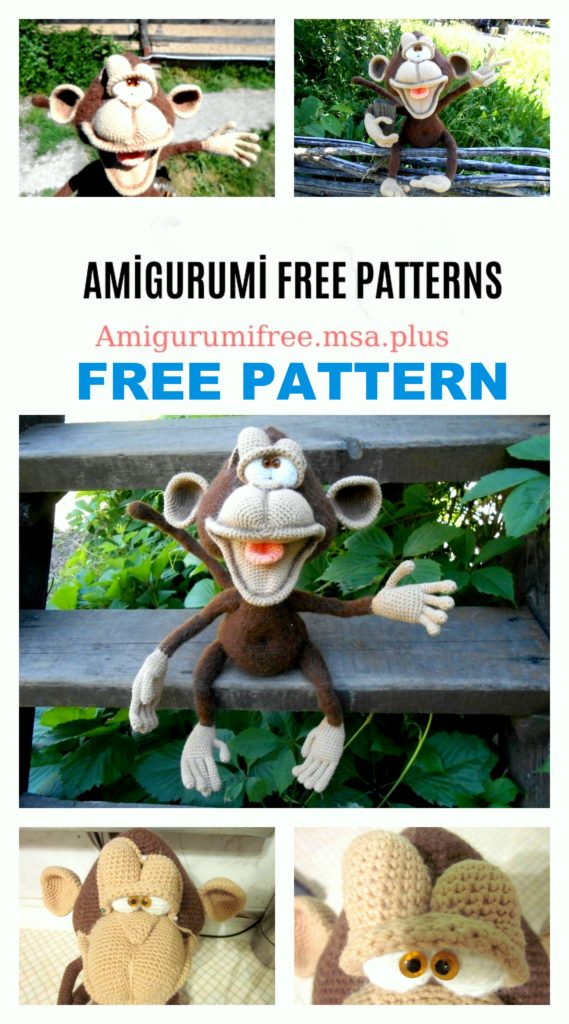
Amigurumi Cute Monkey Free Crochet Pattern
Pinterest Offical Page : Amigurumfree.msa.plus
Facebook Group: Amigurumi Free Patterns
Facebook Offical Page: Amigurumfree.msa.plus
Author’s master class. Please do not share the description, do not post on blogs and
diaries. You can give, sell, or just love a toy. I would be grateful if
mention the name of the author, that is, mine is Oksana Kopp)))
The difficulty is high. The size of the toy is 35 cm.
Materials:
1. Yarn Pekhorka “Mohair” brown 520m in 100 g one skein (knitted in two threads) and
Jeans beige 2 skeins of 50 g (knitted in one thread), a little pink and white yarn
Souffle for the tongue and eyes. Instead of Pehorka, you can take another mohair yarn.
2. The wire
3. Ready-made 7mm studs
4. Filler
5. Toning (I have dry pastel)
Abbreviations:
1. mr– magic ring
2. Sc – double crochet
3. İnc – increase
4. Dec – decrease
5. SL-ST – slip-stitch
6. Ch – chain
On the head and body, the marker goes exactly along the back of the parts. If it creeps sideways
need to do offset loops.
PATTERN
Hands
Fingers
20 pcs. beige thread
1p MAGİC RİNG İNTO 6sc
2p (1sc, inc) X3 = 9
3-4rr 9sc
5p (1sc, dec) X3 = 6
6-12rr 6sc
Left hand
We collect a palm. Attach beige yarn to your finger.
1p 3sc on the first finger, 3sc on the second finger, 3sc on the third finger, 6sc on fourth finger, 3sc on the third finger, 3sc on the second finger, 3sc on the first finger = 24
2-3rr 24sc
4p dec, 10sc, dec, 10sc = 22
5p 22sc
6p (dec, 9sc) X2 = 20
7p 20sc
8p (dec, 8sc) X2 = 18
9p 3sc along with 3sc of the fifth finger, 5sc, dec, 8sc = 17
Insert frame into fingers
10p 3sc on the other side of the fifth finger, 14sc = 17
11-12рр 17sc
13p (2sc, dec) X4, 1sc = 13
To fill a palm. Then fill as you knit.
14p (1sc, dec) X 4, 1sc = 9
15p 9sc
Change thread to brown.
16-28rr 9sc
29p 1sc, 3pr, 2sc, dec, 1sc = 11
30p 11sc
31p 1sc, 3 dec, 2sc, inc, 1sc = 9
32-34rr 9sc
35p 6sc, inc, 2 sc = 10
36p 10sc
37p 7sc, inc, 2sc = 11
38p 11sc
39p 8sc, inc, 2sc = 12
40p 12sc
41p 9sc, inc, 2sc = 13
42-45rr 13sc
Finish, leave the thread for sewing.
Right hand
From 1p to 8p we knit in the same way as the left hand
9p 5sc, 3sc with the fifth finger, 8sc, dec = 17
Insert the wireframe.
10p 5sc, 3sc on the other side of the fifth finger, 9sc = 17
11-12рр 17sc
13p (2sc, dec) X4, 1sc = 13
To fill a palm. Then fill as you knit.
14p (1sc, dec) X 4, 1sc = 9
15p 9sc
Change thread to brown.
16-28rr 9sc
29r 3pr, 2sc, dec, 2sc = 11
30p 11sc
31p 3 dec, 2sc, inc, 2sc = 9
32-34rr 9sc
35p 6sc, inc, 2 sc = 10
36p 10sc
37p 7sc, inc, 2sc = 11
38p 11sc
39p 8sc, inc, 2sc = 12
40p 12sc
41p 9sc, inc, 2sc = 13
42-45rr 13sc
Finish, leave the thread for sewing.
Feet in beige yarn.
I knitted legs without loops of displacement. But everyone has a different knitting density and it may very well be that
you still have to make a bias loop.
Where three increases are the knee))))
Right
We attach the thread to the finger
1p 3sc on the first finger, 3sc on the second finger, 3sc on the third finger, 6sc on the fourth finger, 3sc on the third finger, 3sc on the second finger, 3sc on the first finger = 24
2-6rr 24 sc
7p (dec, 10sc) X2 = 22
8p 22sc
9p 10sc, 3sc together with 3sc of the fifth finger, 9sc = 22
Insert frame into fingers
10p 10sc, 3sc on the other side of the finger, 9sc = 22
11p (9sc, dec) X2 = 20
12p 20sc
13p (8sc, dec) X2 = 18
14p 18sc
15p (7sc, dec) X2 = 16
Bend the wire of the frame, making it perpendicular to the fingers.
16p 11sc, 2ch go around the wire, skip 2sc on the foot, attach a chain of sc loops, 2 sc = 16
Stack your foot.
17p (2sc, dec) X4 = 12
18p 6 dec = 6 Pull the hole.
Brown yarn dial 9 loops on the foot around the wire frame. Start dialing from the heel, put a marker.
Stuff your paw as you knit.
1-3rr 9sc
4p inc, 8sc = 10
5p 10sc
6p inc, 9sc = 11
7p 11sc
8p 1sc, inc, 9sc = 12
9-13rr 12sc
14p 3sc, dec, 7sc = 11
15p 3sc, dec, 6sc = 10
16p 2sc, dec, 6sc = 9
17p 2sc, dec, 2sc, 3 inc = 11
18p 11sc
19p 2sc, 2 inc, 1sc, 3 dec = 10
20p 3sc, 2 inc, 5sc = 12
21p 5sc, inc, 6sc = 13
22p 5sc, inc, 7sc = 14
23p 6sc, inc, 7sc = 15
24-34rr 15sc
Finish, leave the thread for sewing.
Left leg
From row 1 to row 15, it fits in the same way as the right leg.
16p 3sc, 2 ch go around the wire frame, skip 2sc on the foot, attach a chain of ch with a single crochet to the next loop behind the skipped, 10sc = 16
Fill foot
17p (2sc, dec) X4 = 12
18p 6 dec = 6 Pull the hole.
Brown yarn dial 9 loops on the foot around the wire frame. Start dialing
from the heel, put a marker.
From 1p to 34p, knit in the same way as the right leg, stuffing as you knit.
Prepare a stiff wire that will be the base. She will go from torso to head and to
we will screw the frames of the arms, legs and tail.
Head – body
The marker goes exactly along the back of the head and body. Where you need to make loops
displacement.
1p 6 sc = 6
2p 6 inc sc = 12
3p (1sc, inc) X6 = 18
4p 3sc, 2 inc, 8sc, 2 inc, 3sc = 22
5p 5sc, 2 inc, 8sc, 2 inc, 5sc = 26
6p 6sc, 2 inc, 10sc, 2 inc, 6sc = 30
7p 7sc, 2 inc, 12sc, 2 inc, 7sc = 34
8p 8sc, 2 inc, 14sc, 2 inc, 8sc = 38
9p 10sc, 2 inc, 14sc, 2 inc, 10sc = 42
10p 11sc, 2 inc, 16sc, 2 inc, 11sc = 46
11p 12sc, 2 inc, 18sc, 2 inc, 12sc = 50
12p 13sc, 2 inc, 20sc, 2 inc, 13sc = 54
13p 15sc, 2 inc, 20sc, 2 inc, 15sc = 58
14p 17sc, 2 inc, 20sc, 2 inc, 17sc = 62
15p 19sc, 2 inc, 20sc, 2 inc, 19sc = 66
16p 20sc, 2 inc, 22sc, 2 inc, 20sc = 70
17p 21sc, 2 inc, 24sc, 2 inc, 21sc = 74
18p 22sc, 2 inc, 26sc, 2 inc, 22sc = 78
19p 24sc, 2 inc, 26sc, 2 inc, 24sc = 82
20p 25sc, 2 inc, 28sc, 2 inc, 25sc = 86
21p 26sc, 2 inc, 30sc, 2 inc, 26sc = 90
22-28rr 90sc
29p (13sc, dec) X6 = 84
30p (12sc, dec) X6 = 78
31p (11sc, dec) X6 = 72
32p (10sc, dec) X6 = 66
33p (9sc, dec) X6 = 60
34p (8sc, dec) X6 = 54
35p (7sc, dec) X6 = 48
36p (6sc, dec) X6 = 42
37p (5sc, dec) X6 = 36
38p (4sc, dec) X6 = 30
39p (3sc, dec) X6 = 24
40p (2sc, dec) X6 = 18
41-48rr 18sc
Stuff your head tight.
49p (2sc, inc) X6 = 24
In the 50th row, on the 8th loop to the right and left of the marker, stretch the wire for the hands. Screw it to
the main frame.
50r (3sc, inc) X6 = 30
51p 30sc
52p (4sc, inc) X6 = 36
53-54rr 36sc
55r (5sc, inc) X6 = 42
56-57rr 42sc
58p (6sc, inc) X6 = 48
59-62rr 48sc
On row 63, extend the tail wire at the marker level. To fasten.
63p (1sc, inc) X5, 28sc, (inc, 1sc) X5 = 58
64p (2sc, inc) X5, 28sc, (inc, 2sc) X5 = 68
65-70rr 68sc
In row 70, on loop 18 from the marker, stretch the wire for the legs. To fasten.
71p 10sc, dec, (9sc, dec) X4, 10sc, dec = 62
72p 14sc, dec, 30sc, dec, 14sc = 60
73r (8sc, dec) X6 = 54
74p 54sc
75r (7sc, dec) X6 = 48
76p (6sc, dec) X6 = 42
77p (5sc, dec) X6 = 36
78p (4sc, dec) X6 = 30
79p (3sc, dec) X6 = 24
80r (2sc, dec) X6 = 18
Fill with filler
81p (1sc, dec) X6 = 12
82p 6 dec = 6
Pull the hole. Sew arms and legs.
Lower jaw
Beige yarn. Do not remove markers.
1p MAGİC RİNG İNTO 6sc
2p 6 inc = 12
3p (1sc, inc) X6 = 18
4p (2sc, inc) X6 = 24
5p (3sc, inc) X6 = 30
6-9 pp 30sc
10p (4sc, inc) x6 = 36
11-14rr 36sc
15p (5sc, inc) X6 = 42
16-18rr 42sc
19p (6sc, inc) X6 = 48
20-21рр 48sc
22p 16sc, (1sc, inc) X8, 16sc = 56
23p 56sc
24p 12sc, inc, 30sc, inc, 12sc = 58
25p (3sc, inc) X2, 3sc, 3sc in one loop, 34sc, 3sc in one loop, 3sc, (inc, 3sc) X2 = 66
Fasten the thread, cut.
Upper jaw
Beige yarn.
1p MAGİC RİNG İNTO 6sc
2p 6 inc = 12
3p (1sc, inc) X6 = 18
4p (2sc, inc) X6 = 24
5p (3sc, inc) X6 = 30
6p (4sc, inc) x6 = 36
7p (5sc, inc) X6 = 42
8p (6sc, inc) X6 = 48
9-11rr 48sc
12p (7sc, inc) X6 = 54
13-15rr 54sc
16p (8sc, inc) X6 = 60
17-21рр 60sc
22p 16sc, (3sc in one loop) X2, 24sc, (3sc in one loop) X2, 16sc = 68
23 p 68 sc
24p 17sc, (inc, 1sc) X3, inc, 20sc, inc, (1sc, inc) X3, 17sc = 76
25p 76sc
Do not break the thread, continue to knit on the upper jaw 22sc, fold with the lower jaw,
knit 32sc together, (we begin to tie the lower jaw from the 16th loop from the marker, i.e.
we knit from the corner to the other corner of the mouth, it turns out that inside the mouth), then 22sc only on the top
jaw to the marker.
Then we knit in a large circle: 22sc along the upper jaw, 34sc along the lower part of the lower
jaw, 22sc in the upper jaw. Knit another row in a circle 78sc.
Make a wire frame for the face.
Insert the frame so that the wire passes along the edge of the jaws, resting against a knitted fabric.
On the upper jaw, the wire should go 2-3 rows below the beginning of knitting. Flash edge
jaws through, grabbing the wire.
Tongue
Red or pink yarn.
1p MAGİC RİNG İNTO 6sc
2p 6 inc = 12
3p (3sc, inc) X3 = 15
4-10rr 15sc
Fold in half, knit through, sew in the mouth at the junction of the jaws. Can flash
the tongue in the middle, as in the photo, but I refused this venture.
We stuff the upper jaw. The bottom does not need to be stuffed. We will add filler just a little at the very head when we are already sewing on the muzzle. We try on the muzzle to the head, forming
wire smile. Choose your location. I sewed so that the corners of the mouth are
on the corners of the head. As you sew, add filler to the upper jaw until elastic.
There will be ducks. In the lower jaw, we place the filler only at the very head, at the end of the jaw
poke it is not necessary.
Nose
1p MAGİC RİNG İNTO 4 sc
2p (1sc, inc) X2 = 6
3p (1sc, inc) X3 = 9
4p 9sc
5p (2sc, inc) X3 = 12
6p 12sc
7p (3sc, inc) X3 = 15
8p 15sc
9p (4sc, inc) X3 = 18
10p 18sc
Fold in half, knit through.
Make a tightening on the face. Fasten the thread inside the mouth on the upper jaw in about the 20th row,
insert the needle, withdraw on the top of the muzzle in the 18th row at the level of the marker, stretch the thread
on top of the knitted fabric, insert the needle at the beginning of knitting, withdraw inside the mouth in 4 rows, in place
stitching the edges of the jaw, stretch the thread over the knitting, fasten in the 20th row. Repeat the tightening.
Sew the tip of the nose in the 18th row, at the place where the thread for tightening is withdrawn, bend the part a little to get the nostrils, sew on the sides by a centimeter and the edge of the nose to the 24th row.
Eyelids with beige thread eyes
1st eyelid
1p MAGİC RİNG İNTO 6sc
2p 6 inc = 12
3p (1sc, inc) X6 = 18
4-10 pp 18 sc
Break the thread
2nd eyelid
1p MAGİC RİNG İNTO 6sc
2p 6 inc = 12
3p (1sc, inc) X6 = 18
4-6rr 18sc
We connect two centuries.
1p we knit through 3 sc both centuries, then 30 sc for the front half-loop in a circle in one and the other eyelids (marker between the eyelids)
2-6 pp 30 sc for both half loops
Break the thread.
1st eye
1p From the wrong side at the marker level, attach the white thread to the row that was knitted for the front half-loop, knit the back half-loop 15sc and 3 sc along the extreme half-loops of the jumper between the eyelids = 18
2-4 pp 18sc
5p (1sc, dec) X6 = 12
Fill a bit
6p 6 dec = 6
Pull the hole.
2nd eye
1p We attach the white thread to the row that was knitted for the front half-loop to the second century,
we knit 3 sc on the extreme half-loops of the jumper, 15 sc for the rear half-loops = 18
2-4 pp 18sc
5p (1sc, dec) X6 = 12
Fill a bit
6p 6 dec = 6
Pull the hole.
The free edge of the eyelids (the one with which both centuries were tied), wrap higher in front and behind
on the contrary, lower, as if forming the back wall. Grab a thread so as not to
curled up. Try on the muzzle and sew on the edge. Try on the eyes, see when
what position the expression of the face will like more. Stick on. I took clove eyes
0.7 cm. I tried to try on more eyes, but the monkey’s face is not so dumb
it turns out.
Ears of beige yarn (2 pcs)
1p MAGİC RİNG İNTO 6sc
2p 6 inc = 12
3p (1sc, inc) X6 = 18
4p (2sc, inc) X6 = 24
5p (3sc, inc) X6 = 30
6p (4sc, inc) x6 = 36
7p (5sc, inc) X6 = 42
8-14rr 42sc
15p (5sc, dec) X6 = 36
16p (4sc, dec) X6 = 30
17p (3sc, dec) X6 = 24
18p (2sc, dec) X6 = 18
19p (1sc, dec) X = 12
Leave the thread for sewing. Fold in half.
Sew on ears from the 17th to the 20th row.
Eyebrows
I made eyebrows different in shape and size. At first I tried on pieces of thread, looked at
expression of muzzle, then, when I picked up the one that suited me, I typed in knitted
crochet the columns without crochet and knitted back and forth another 2 rows.
Tail
1p MAGİC RİNG İNTO 6sc
2p 6 inc = 12
3-4rr 12sc
5p dec, 10sc = 11
6p 11sc
7p dec, 9sc = 10
8p 10sc
9p dec, 8sc = 9
Fill the tip of the tail with a little filler. If desired, you can add a little
filler along the entire length if the wire is thin. Next, knit to the desired length.
Put the tail on the frame and sew on.
Weighting priests and belly button
We fix the thread in the last row, insert the needle, put it on the back under the tail, stretch it
thread over knitting and again insert the needle into the last row of the body, pull up the thread. Make
so 2-3 times. Then, without breaking the thread, insert the needle into the last row, put it on the tummy in row 63, make a stitch in one loop and put the needle in the same place, put it in the final row.
Tighten the thread, fasten.
Tinting
I tint dry pastel. Slightly toned nostrils inside. To tint the edge of the jaw, where there is a seam, inside the mouth and outside, a tightening on the upper jaw from the nose to the beginning of knitting, the middle of the tongue, the inside of the ears, the lower side of the eyebrows.
Comb a little toy.
Our monkey Marmyn is ready!
